
Is printed travertine really suitable for hotel lobbies? Rather than memorizing parameters, it is better to look at a real project that has already been delivered.
To sum up in one sentence:
The figures in the article all come from delivery archives; those marked "rough estimate" are inferred according to common industry magnitudes and are used to judge magnitude, not actual measured bills.The underlying account of this Xichang order
First present the verifiable information; the subsequent analysis will all revolve around this table.
| Project location | Xichang City, Sichuan Province |
| Project type | Hotel lobby |
| Materials used | Printed travertine (Glacier Gray) (travertine series) |
| Material specifications | 1220×2930mm | thickness 2.5–3.5mm | single piece about 17kg |
| Wall area | Approx. 520 ㎡ (◆ budget estimate) |
| Construction process | Full bonding method, direct wall installation after leveling, no keel required |
| Implementation standards | JG/T 540-2017 'Building Flexible Stone-faced Decorative Material' |
| Application location | Lobby main wall / welcome backdrop, round columns / curved column cladding, elevator hall / walkway, wall base 0–300mm |
Lighting and wall surfaces are a pair of co-conspirators. On the same panel, the texture becomes lighter under 3000K warm light, and under 4000K it is closest to the original appearance of the sample; when a spotlight grazes across it at an angle, the texture relief is most distinct. On the day of color selection, be sure to have the light aimed at the sample; the downlights in the showroom and the linear lights on site are often two different worlds.
Glacier Gray under the lighting in this space
The natural-light period and the lighting period are two different walls. Before delivery we specifically looked once in the morning and once in the evening: gray tones are the most honest about light, and the wall changes with whatever color temperature the lighting has; be sure to bring a light to compare on the day of sample confirmation.
Wall materials and acoustics are opposing forces that balance each other. Hard, dense finishes reflect strongly and make a space sound hollow; porous structures absorb sound well but are vulnerable to grease and moisture. The mature approach is zoning: control reverberation where people stay longest, leave corridors and background walls to the finish, and account for the two separately.
The most valuable thing in construction organization is rhythm. Before the crew enters the site, the sample wall, layout marking, and material preparation should all be completed; the most commonly seen waste on site is boards not arriving, people waiting, and lights on. Organize transfer according to "materials never touch the ground," finish and clean the work area the same day, and the construction period will naturally be shortened.
On the day the owner visited the site
When the owner's side arrived on site, they asked only three things, and we answered in order: feel of the seams (run a fingernail along them to check for height differences), straightness of edge-sealing adhesive, skirting junctions, and precision of switch-plate cutouts.
Records from that time, quoted verbatim
Flipping the file back to those two weeks of construction, a few passages are quite candid:
Image display and application notes
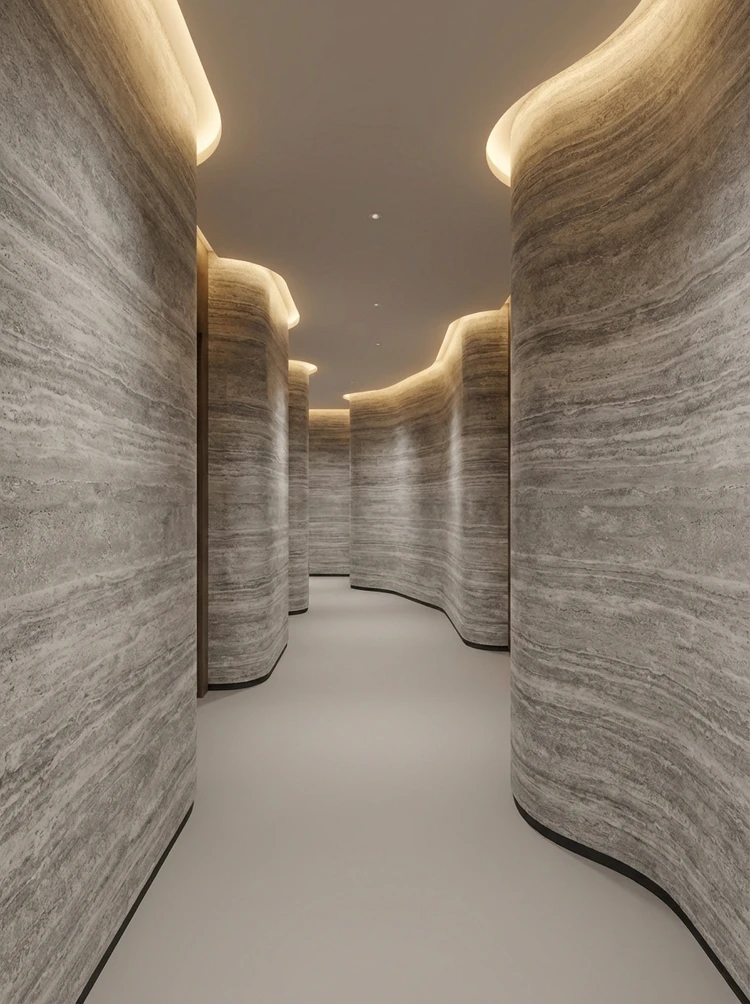
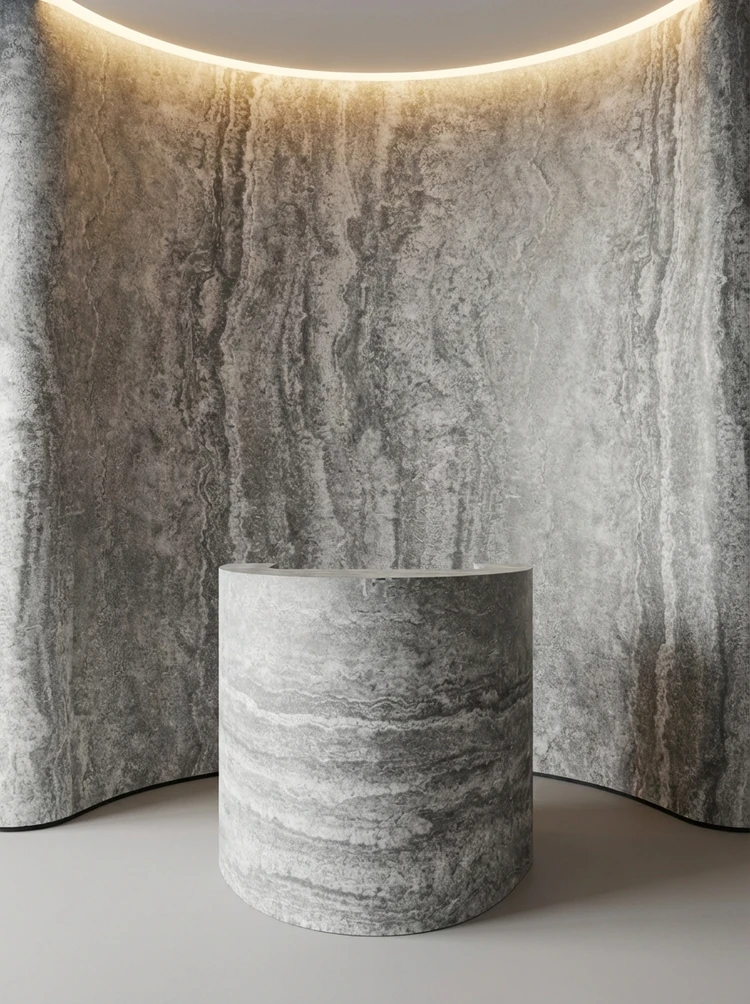
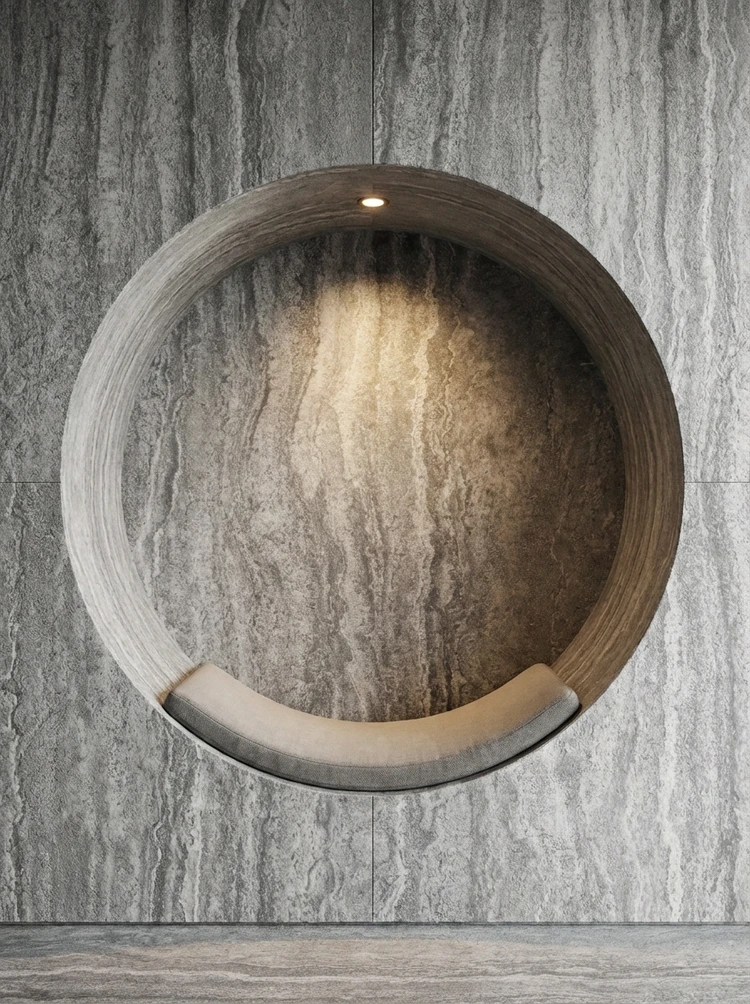
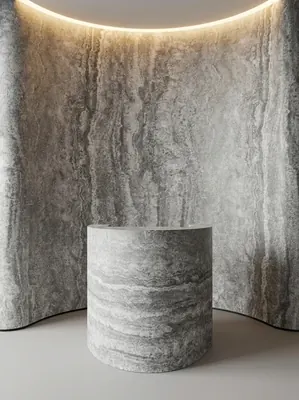
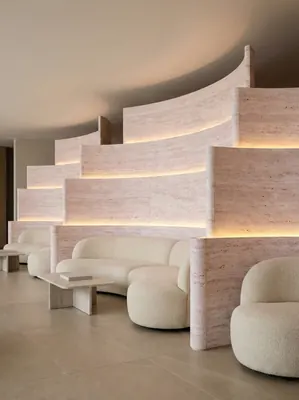
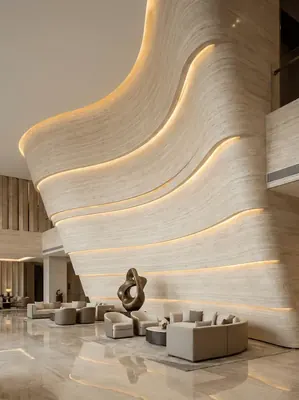
This project has a total of 4 application photos, all taken on site, covering the elevator lobby corner, lobby walkway, circular reception desk, sculptural niche wall, and other locations.
Usage effect and daily maintenance
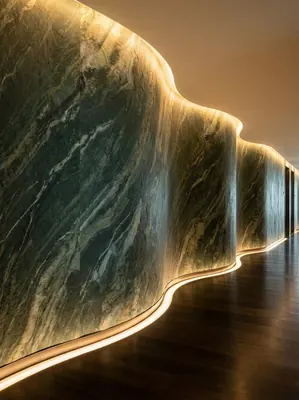
Under the wash of concealed light strips, the travertine's bedding is illuminated layer by layer on the curved wall. Up close it is the stone's pores; from afar it is a clean, uniform sheet of gray — this is the layering that only a matte texture has. For engineering metrics in specific projects (abrasion resistance cycles, stain resistance rating, etc.), please refer to the valid test report for the selected model and project technical confirmation. 7.1 Spatial impression After the ice-gray travertine is installed on the wall, the most direct change is that the space's "sense of weight" has changed: the lobby that previously relied on decorative paintings and furnishings for support now has walls that are content in themselves.
Customer industry use scenario: the real wall requirements for hotel lobbies
Mainly curved surfaces and shapes. Common round columns, curved partitions and arched door openings in lobbies can only be achieved with traditional tiles by small-format piecing with dense seams; flexible materials can be directly bent and wrapped, with continuous shapes and no folded corners. Insufficient panel format will lead to dense seams and fragment the sense of scale in large spaces. Delivery must be fast and must not affect the opening countdown. The lobby is one of the last areas completed before opening, and its schedule is compressed the hardest; solutions that can be directly applied to the wall without keels and curing have obvious advantages.
Communication and confirmation process
Owner: Will it be easy to clean in the future? IGOODS: The surface is dense; daily cleaning with water or a neutral cleaner is enough. Making ad-hoc decisions on site will force the joint lines to be disrupted by cutouts—this is the most common visual problem. Record note: This section is a summary of key points from the communication process, used to explain how the plan was finalized.
For business types with strict fire acceptance requirements (cinemas, KTVs, education and training), besides the finish itself, the construction method also matters: whether the cavity needs insulation fill and whether the keel needs a fire-retardant coating. Clarify the acceptance criteria at the material selection stage, rather than changing the plan after entering the site.
The base layer — this point cannot be overstated. Hollowing, sanding, and moisture content are the three unavoidable safety gates for adhesive-applied finishes. Tap once to listen, run a straightedge once to check flatness, and on walls with heavy moisture, take several readings with a moisture meter. When the base layer is substandard, whatever facing material you apply is just putting a lid on the problem — the spots that bulge three months later are often exactly where the work was skipped at the time.
Individual panels can be replaced, which is the greatest after-sales advantage of this type of finish compared with traditional stone. However, whether the replacement is clean depends on whether records are kept: the layout drawing numbering at the time of installation and the starting point of each wall. If these two are archived, panel replacement can still align the joints three years later.
The decision made on setting-out day
The layout logic sounds simple: with 1220×2930 panels and a 520㎡ wall, how to lay them without narrow strips. This project was done by "setting the starting point behind the furniture." Sockets and access panels on the same wall are incorporated into the joint lines during the layout stage and do not fall in the center of panels.
There is a little trick in on-site management: after each wall is finished, take a "growth photo" with a mobile phone at a fixed position. Compare during acceptance, check batches during maintenance, and use as a case for the next project—one photo serves three purposes. Those photos in the project file that now seem redundant were all key evidence that saved the day at the time.
Pre-entry checklist
Before entering the site, print this checklist and post it at the project office:
- Hollowing rate (tap each panel), joint width uniformity (check with a string line), verticality of external corners (straightedge), panel color difference (inspect under side light)
- Quantity of material preparation and batch number retention
- Joint feel (run a fingernail along to check for height difference), straightness of edge sealant, skirting transition, accuracy of switch panel openings
- Batch verification (batch number on the back of the panel), tight joints in wet areas, wrinkle-free wrapping of columns, texture alignment on feature walls
Lobby main wall / welcome termination detail
Everyone can install the large surfaces; what really takes time on this project are a few inconspicuous edges: leave a 3 mm process joint where glass meets panel, so the thermal expansion and contraction of the two materials do not fight each other.
When receiving goods, do one thing first: check the batch numbers on the back of the panels against the packing list. If batches are mixed, do not argue—take photos on the spot for the record and distribute the mixed-batch panels across different facades. The cost of remediation is far lower than shrugging at the acceptance site.
Half the beauty of large surfaces comes from the seams. If the seam is too narrow, there is no allowance for thermal expansion and contraction; if too wide, the eye is drawn entirely to the line. A common practice in indoor dry areas is a tight seam or a 1–2 mm process joint; at curved surfaces and complex junctions, it is better to leave a seam for routing than to force the panels together. Whether the seam color uses same-color adhesive or a contrasting line is up to the designer.
The day the crew entered the site
The busiest person on site is not the one applying the boards, but the one holding the straightedge. Adhesive must be spread to over 90% coverage; hollow spots always come from the remaining 10%.
For walls in spaces that remain open during business hours, maintenance costs deserve more consideration than initial construction cost. Restaurant walls cannot avoid cooking fumes; when choosing finishes, first ask, "Can oil stains be wiped off?" Retail walls cannot avoid shelf handling, so impact resistance at external corners and the 0-300 mm wall base should be prioritized. Factoring cleaning and repair into material selection is how you reduce the burden on the next store manager.
Construction rhythm of hotel lobbies
Time account: the crew advances according to milestones, with two teams working in shifts for layout and installation. For hotel lobbies, one day earlier delivery means one day earlier revenue; the owner calculates this account more clearly than we do.
Leaving three days for ventilation before acceptance prior to opening is spending a little to achieve a lot. The finish itself does not retain odors, but adhesive joints and backing will retain construction residue; coordinate with the schedule in advance and include this period in the plan.
Review notes
To discuss the retrospective, this project has two lessons worth copying and one lesson not recommended to repeat: half a day was reserved on the day of layout, letting the column-position segmented seams into the internal corner, which was worth it; if the sample wall had been made two days later, the color difference dispute would have dragged all the way to the delivery day.
Handy answers
Q: Will the ice ash cave stone look too cold?
A: Cold gray is the characteristic of this color scheme. If the space itself has cold lighting, warm-colored light strips can be used to create layers, or light gray, beige and other adjacent colors can be selected; you can also partially retain wooden or fabric soft decoration to compensate for temperature.
By the way, answering a frequently asked question: why is travertine suitable for the curved walls of a hotel lobby?? Travertine texture itself has bedding and pores, visually "having content without stealing color." Travertine in flexible stone form can be bent within a certain radius, allowing continuous wrapping of curved walls, columns and arches without folded corners; traditional natural travertine requires waterjet processing for curved surfaces, with much higher cost and lead time.
Q: How do you estimate the wall area of a lobby?
Answer: Calculate by lobby perimeter × floor height, deduct door and window openings, then multiply by the cladding ratio (lobbies are usually 60%–70% because elevator doors and decorative surfaces account for a high proportion). The budget estimate for this case is about 520㎡, a common magnitude for a medium-sized hotel lobby.
A sentence left in the record
A record from that time is kept in the archive: How is lobby wall area estimated? Multiply the lobby perimeter × floor height, deduct door and window openings, then multiply by the application ratio (usually 60%–70% for lobbies, because elevator doors and decorative surfaces account for a high proportion).
It is recommended that the handover document package consist of five fixed items: layout drawings, batch number list, copies of test reports, maintenance instructions, and material storage location map. We have seen projects that used all five, and projects that argued for two extra weeks because one was missing.
On-site real shots, explained one by one
On-site photos are more honest than renderings. Here are a few photos taken at the time; look at the images first, then we'll discuss the details:
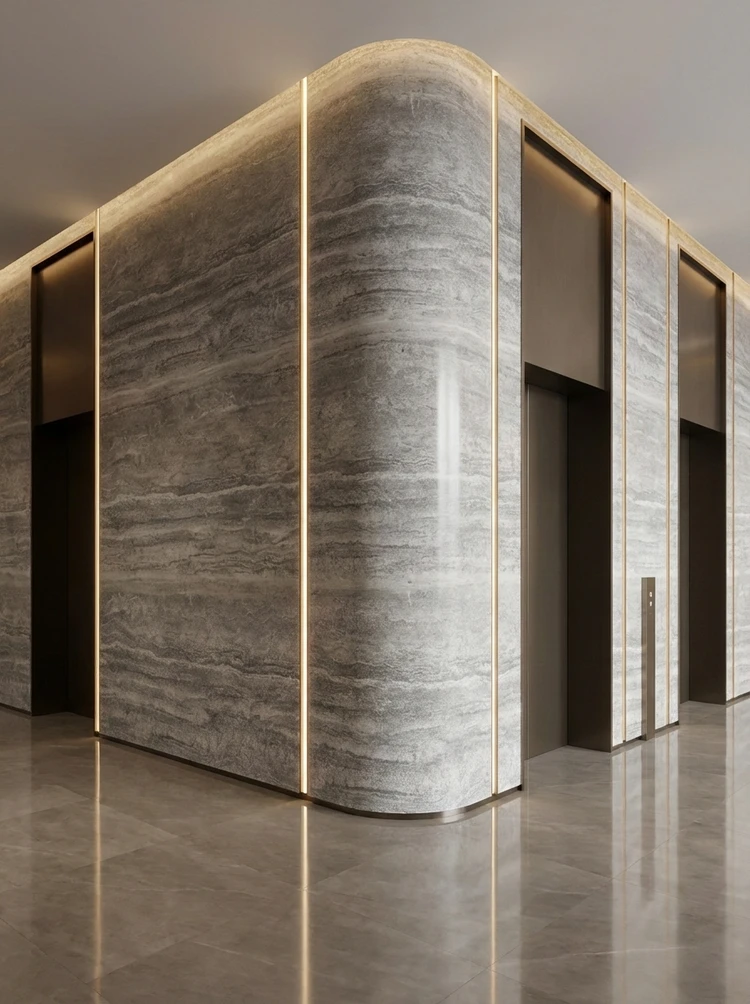
This photo was taken right after finishing a detail: elevator lobby corner, gray horizontal stone-textured curved wall and vertical gold frame.
Corridor: gray horizontal stone-pattern curved wall with warm lighting at the top of the wall. It is not noticeable from afar; only up close can you tell the layout follows 1220×2930 panels.
The cost of dark colors is showing dust and absorbing light; the cost of light colors is showing seams and being prone to dirt. This should be said at the color selection stage. For high-traffic locations (cashier counters, self-service areas, corridor end walls), our recommendation is medium brightness: good-looking and durable.
There are two schools of internal/external corner treatment: full-sheet wrapping and mitered corners. Full-sheet wrapping looks good but demands strict right-angle precision from the substrate; mitered corners are safer, and the eye can accept a slightly offset seam position. External corners in public spaces have a high probability of being hit; better to use mitered corners plus corner guard edging than to gamble for appearance.
The condition seen during the follow-up visit after one year
Follow-up visit after the warranty period, wall condition: panel surfaces clean, seam lines free of accumulated dust and darkening. Daily care is simply not directing a steam mop at the seams; when the sofa is occasionally moved, check the hanging hardware behind it.
Record of one material selection meeting
The owner's initial idea was to use ceramic tile, and we talked them out of it. Reason: panels are taken by floor number during installation, and batch management is completed at the source. After switching to printed travertine, test bending at small radii showed no springback, so the curved surfaces in the renderings could actually be realized.
Related reading
Related pages are placed here for easier verification:
Next:About 620㎡ wabi-sabi white travertine in the lobby of a hotel in Ya'an: how to choose white walls
Related articles
Hotel lobby 480㎡ printed granite (Glacier Green) wall construction case
IGOODS of AIGUOSI provides printed granite (Glacier Green) as wall material f...
酒店大堂520㎡打印洞石(冰川灰)墙面施工案例
艾谷思IGOODS 为四川省西昌市一处酒店大堂项目提供打印洞石(冰川灰)作为墙面材料,采用满粘法直接上墙、无需龙骨基层。项目墙面概算约 520㎡,材料规格...
酒店大堂620㎡打印洞石(侘寂白)墙面施工案例
艾谷思IGOODS 为四川省雅安市一处酒店大堂项目提供打印洞石(侘寂白)作为墙面材料,采用满粘法直接上墙、无需龙骨基层。项目墙面概算约 620㎡,材料规格...
酒店大堂1850㎡打印洞石(侘寂米黄)墙面施工案例
艾谷思IGOODS 为四川省眉山市一处酒店大堂项目提供打印洞石(侘寂米黄)作为墙面材料,采用满粘法直接上墙、无需龙骨基层。项目墙面概算约 1,850㎡,材...
cases related
Hotel lobby 480㎡ printed granite (Glacier Green) wall construction case
IGOODS of AIGUOSI provides printed granite (Glacier G...
View cases →
酒店大堂520㎡打印洞石(冰川灰)墙面施工案例
艾谷思IGOODS 为四川省西昌市一处酒店大堂项目提供打印洞石(冰川灰)作为墙面材料,采用满粘法直接上墙、...
View cases →
酒店大堂620㎡打印洞石(侘寂白)墙面施工案例
艾谷思IGOODS 为四川省雅安市一处酒店大堂项目提供打印洞石(侘寂白)作为墙面材料,采用满粘法直接上墙、...
View cases →
酒店大堂1850㎡打印洞石(侘寂米黄)墙面施工案例
艾谷思IGOODS 为四川省眉山市一处酒店大堂项目提供打印洞石(侘寂米黄)作为墙面材料,采用满粘法直接上墙...
View cases →