
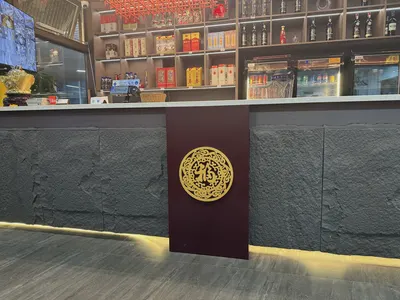
First look at the result: the food service cashier counter in Guangzhou, 110㎡ of wall, uses PU stone veneer (gray), fully bonded onto the wall, and there has been no rework since delivery.
Back to the point,
This article does not recite a parameter table; it lays out the process of this 110 m² order in Guangzhou step by step: base account, decisions, construction, acceptance, follow-up—one stage at a time.The page of tables handed to the client
Before the review, let's lay out the base records first; these are all materials kept on file at the time.
| City | Guangzhou, Guangdong Province |
| Space type | Dining cashier counter |
| Business type | Dining store |
| Main material. | PU stone skin (gray) |
| Construction area | Approx. 110㎡ |
| Construction period | 4 working days |
| Schedule | 4 working days |
| Implementation standards | JG/T 540-2017 |
| Construction location | Dining store cashier counter feature wall and dining area wall |
You only know whether you chose right when the light hits it
Choose the wrong color temperature, and the material choice is wasted. Lighting conditions for this project: gray tones are the most honest about light; the wall changes with whatever color temperature the lighting has. Be sure to bring a lamp when comparing on sample approval day.
Handling of the three hurdles
Everyone can install the large surfaces; what really takes time on this project are a few inconspicuous edges: leave a 3 mm process joint where glass meets panel, so the thermal expansion and contraction of the two materials do not fight each other.
Many people blame the smell when new materials enter the site on the finish, but in fact about 80% comes from adhesive and base auxiliary materials. The environmental protection standard depends on the entire supply chain: if the main material meets the standard but the auxiliary materials are poor, there will still be odor. Having auxiliary materials also included in the acceptance checklist in projects is no longer an advanced practice; it is standard practice.
There is a little trick in on-site management: after each wall is finished, take a "growth photo" with a mobile phone at a fixed position. Compare during acceptance, check batches during maintenance, and use as a case for the next project—one photo serves three purposes. Those photos in the project file that now seem redundant were all key evidence that saved the day at the time.
What can be taken away from this order
To discuss the retrospective, this project has two lessons worth copying and one lesson not recommended to repeat: the starting point was moved to the corridor side, so the owner's circulation route happened to start from a complete board, and all narrow strips went behind the furniture.
The correct approach to knock and bump repair is to replace the panel rather than touch up the paint. Reserving 3%-5% spare material when ordering is for exactly this purpose: the real problem is when the replacement panel does not match the batch color difference. Spare material stored in the warehouse is much safer than loose panels left on site.
Three things separate a rendering from the real thing: vein density, seam method and gloss level. Stone-texture walls in rendering libraries are often 'density-amplified versions'; looking for materials by copying them directly will disappoint. The reliable path is to use the rendering to set the character, use samples to set specifications, and use a 1:1 sample wall to set final expectations.
For projects under construction while still operating, the time window matters more than labor hours. For night work sections, coordinate noise timing, freight elevator use, and fire access occupation with property management in advance. These coordination items cannot be scheduled into the process table, but they can determine whether the entire project is delivered several days late.
With the same quote, whose money is spent where it matters most? When the material grade is the same, the difference usually comes down to two items: waste and substrate treatment. A crew willing to spend an extra half day on setting out can reduce cutting waste by two percentage points, which is far more respectable than cutting the material budget.
When finishing pieces are used well, the facade grade immediately becomes stable. For supporting pieces such as corner pieces, skirting lines and door frame trim, whether the color follows the main surface or the floor must be finalized before ordering. The most common failure is that after the wall is finished, the line color is half a grade off, and patching either side looks bad.
There is a message in the images
The images don't need retouching; it's enough to clearly see the seams, light and edge finishing:
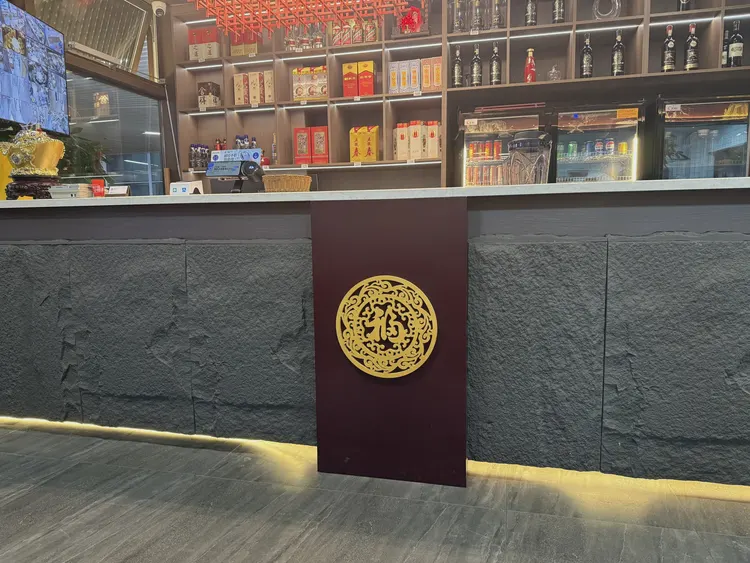
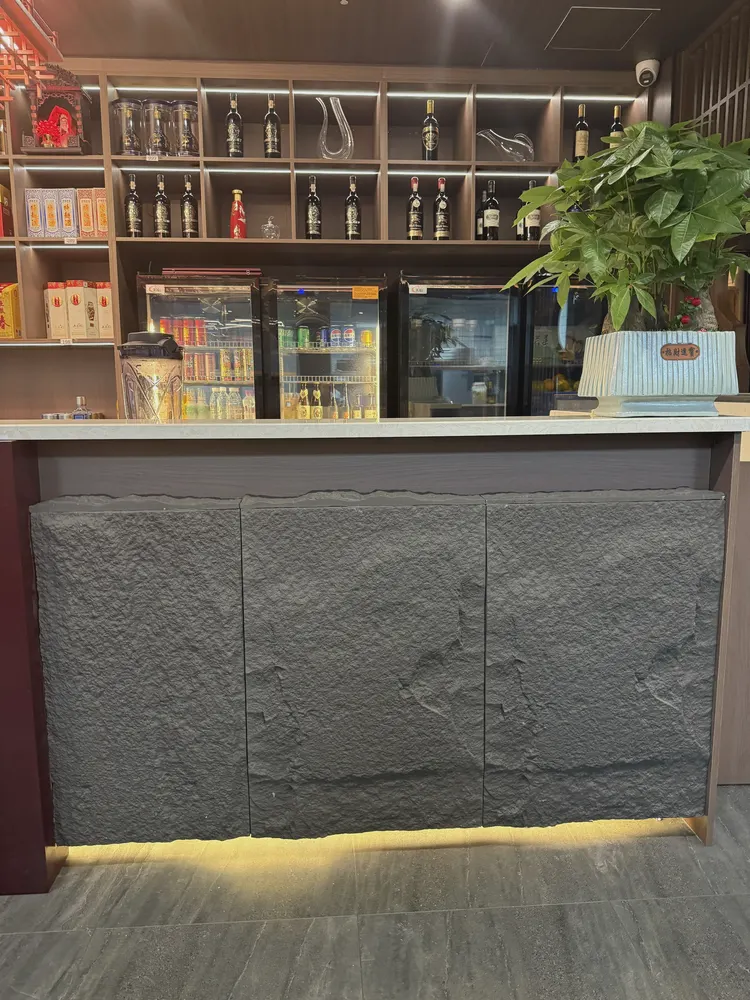
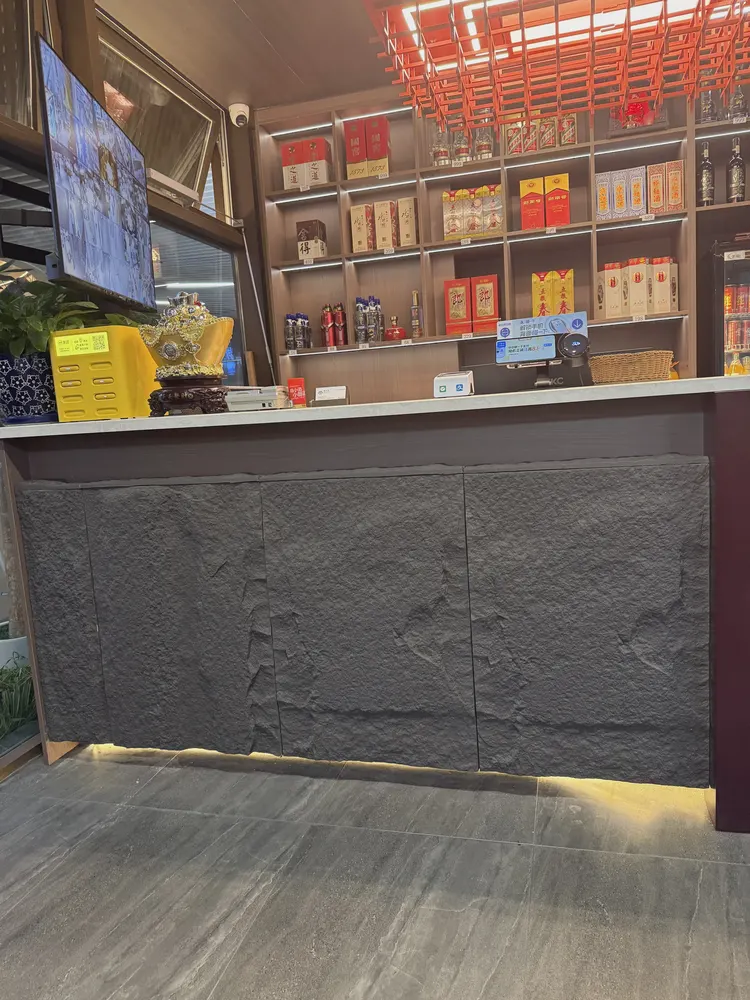
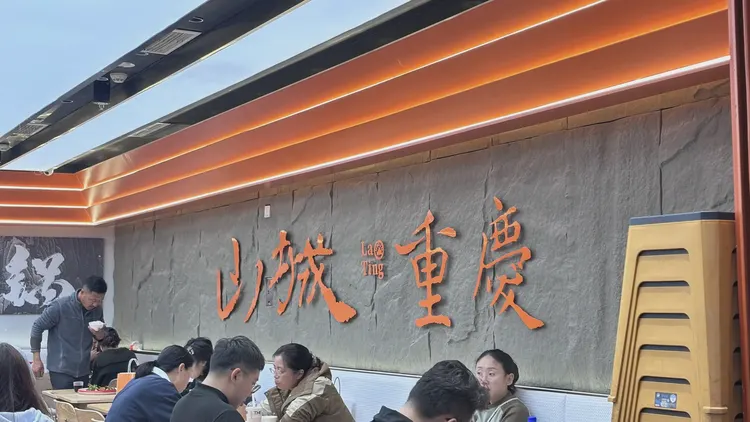
Dining cashier counter with dark gray coarse-textured facade and wall-base lighting. It doesn't stand out from a distance; only up close can you tell that the layout follows 1220×2930 panels.
This photo was taken right after finishing a detail: side view of the cashier counter, gray block texture and wine rack above.
For new projects, look at renderings; for renovation projects, look at the medical records. In a space that has been lived in for ten years, the walls have far more stories behind them than bare walls: modified electrical points, added partition walls, and water seepage spots patched again and again. Wall inspection before entering the site is more important than any material selection meeting.
Pre-entry checklist
Here is a self-check list for friends who also do restaurant cashier counters; only when the conditions are checked does the material come up for discussion:
- Measured record of substrate moisture content
- Relationship between starting point and column positions
- Quantity of material preparation and batch number retention
- Brand and color of edge sealant
The most time-saving opening for a client meeting is three questions: what do you want people to see on this wall, what actions do people take by the wall, and how often is it cleaned. Once these three questions are answered, the budget range and material list basically converge.
The base layer — this point cannot be overstated. Hollowing, sanding, and moisture content are the three unavoidable safety gates for adhesive-applied finishes. Tap once to listen, run a straightedge once to check flatness, and on walls with heavy moisture, take several readings with a moisture meter. When the base layer is substandard, whatever facing material you apply is just putting a lid on the problem — the spots that bulge three months later are often exactly where the work was skipped at the time.
The question I was stumped by at the time
By the way, answering a frequently asked question: can it be applied directly when renovating an old wall? Yes, provided the original wall is solid and free of hollow areas; old tile surfaces can also be covered directly. However, before construction, every surface must be checked for hollow areas, and hollow spots must be knocked out and redone—this step cannot be skipped.
How much difference is there in texture compared to natural stone?
A: When viewed up close, the differences can be seen: natural stone has random variation that occurs naturally, while the texture of PU stone skin is formed by embossing or printing, and consistency within the same model is higher. From a distance, the overall look is close. When placing natural stone and flexible materials next to each other on adjacent walls in the same space, it is recommended to do a small sample comparison first.
Someone asked this: how long does the construction period generally take? This project is about 110㎡, with a crew of 3, completed in 4 working days (including substrate treatment and finishing). Installation itself accounts for about 1 working day; the rest is substrate work, layout marking, and acceptance. The main variable in the schedule is substrate condition—substrate rework directly consumes the time saved by installation.
By the way, answering a frequently asked question: can curved walls and wrapped columns be done in one continuous piece?? Yes. The material has a certain flexibility and can be bent within a certain radius, so cylindrical columns, curved walls and irregular corners can be fully wrapped in one piece with continuous seams. The specific usable radius depends on the selected model, thickness and substrate conditions; it is recommended to first test-bend a physical sample at the corresponding curvature to confirm.
Those two hours before handover
For acceptance of this type of project, it is recommended to walk through once during the day and once at night. Every item on the acceptance form must be traceable to a physical spot on the wall.
Acceptance tools need not be complicated: a two-meter straightedge, feeler gauge, hygrometer, and strong flashlight. Use the straightedge to check flatness, the feeler gauge to check joints, and hold the flashlight close to the wall at a grazing angle—undulations and adhesive marks cannot hide under this light.
Original archive excerpt
The following passages come directly from project records and can serve as references when writing proposals:
Communication and confirmation process
The following are several questions confirmed by both parties during material selection and construction, organized in the order of the conversation. Us: The three-dimensional stone blocks of the PU stone skin have their own layering under spotlights, so no additional decoration is needed. Shop owner: This wall has a lot of grease—is it easy to wipe? Us: The surface is dense; a neutral cleaner and a soft cloth will do.
Material comparison: why choose "PU stone veneer"
What atmosphere does the space want? Keel-free installation allows renovation before opening to keep the schedule under control. The answers to the three questions in this project: the 3D stone blocks of the PU stone veneer show clear layering under the spotlight at the cashier counter; the convex and concave surface is scrub-resistant, suitable for high-frequency cleaning in food and beverage settings; keel-free installation allows renovation before opening to keep the schedule under control. When comparing wall materials side by side, what really determines the selection is often not "which looks better," but whether the substrate can bear weight, whether the schedule can be compressed, and whether the shape can be achieved.
Construction process and acceptance control points: on-site method for "PU Stone Skin"
Cutting processing: Cut according to the layout dimensions; cover cut edges with edge trim or pressure strips; determine hole positions at the layout stage. Edge finishing: Use matching edge trim pieces for internal and external corners; execute junctions with door frames, ceilings and floors according to the detail drawings. Full-adhesive installation: The full-adhesive method is recommended; start laying from the main viewing surface and proceed toward both sides and upward; for curved areas, lay along the curve direction.
For business types with strict fire acceptance requirements (cinemas, KTVs, education and training), besides the finish itself, the construction method also matters: whether the cavity needs insulation fill and whether the keel needs a fire-retardant coating. Clarify the acceptance criteria at the material selection stage, rather than changing the plan after entering the site.
There is an unspoken consensus in the industry on the common defect grading of panel surfaces: only what is visible to the naked eye at a distance of one meter counts as a defect; what can only be seen under oblique light is considered process variation. Before acceptance, writing "what is acceptable" into the sample wall confirmation form is much cheaper than arguing on site afterward.
The judgment sequence for wet-area walls (bathrooms, spas, pool surrounds) is: intact waterproofing layer → moisture-proof substrate → non-absorbent finish → dense joints. If all four pass, the finish is only the final layer of protection; if any one fails, no matter what is applied, problems will occur. The flexible finish itself does not absorb water, but it places higher demands on the honesty of the substrate.
The condition seen during the follow-up visit after one year
For use and maintenance, three instructions were left with the store at handover: routine dust removal is sufficient; wipe up spills promptly and do not leave them overnight; place a piece of cardboard under furniture when moving it
The document chain for export projects is longer than for domestic ones: CE conformity documents, RoHS, REACH, and pre-shipment inspection before sea freight, and what each market recognizes is not entirely the same. The EU recognizes the CE system, Southeast Asia and the Middle East often require SGS or national inspection reports, and South American customers may require Spanish labels. Check the list all at once before placing an order, and both the freight forwarder and the customs clearance agent will have an easier time.
Layout and quantity accounting
Setting out took most of a day. For the restaurant cashier counter feature wall and dining area walls, every section had a different starting point; walls that look the same on drawings are never the same on site. Before finalizing the layout drawing, we checked all soft-furnishing positions—this is the only way to avoid 'furniture in place, seam in the middle.'
Walls in dark-scene spaces (cinemas, bars, clubs) absorb light severely. Dark colors will appear one level darker under low illuminance. To achieve the effect of "texture visible but material boundaries not visible," it is often necessary to choose a color number half a level lighter than the target color, or embed a wall-washing light at the finishing edge.
Construction rhythm of the dining cashier counter
In terms of schedule, 4 working days. There was a power outage for maintenance in the middle, so the crew switched to setting out and did not let the days go empty.
The logic of facade waterproofing is "channeling is better than blocking": the finish layer prevents rainwater infiltration, while the structural layer must lead entering water out. With drip lines, flashing boards, and joint sealant all in place, the facade can truly face the heavy rain season.
Practical implementation specifications for wall application
The construction difficulty of this order is not in the hands but in the sequence: inspection windows are left between the three stages of sample wall—large area—closing, which looks like half a day wasted but actually wins back three days.
Cylindrical column cladding is the part that most tests layout skills. The panels wrapping the column must either be bent as a whole sheet or joined in segments; segments inevitably mean vertical seams, and the seam positions should fall in dark areas where the column meets the wall, not directly facing the passage. For columns with small radii, first wrap a physical panel sample around the column to check springback, then decide between full wrapping and piecing.
When receiving goods, do one thing first: check the batch numbers on the back of the panels against the packing list. If batches are mixed, do not argue—take photos on the spot for the record and distribute the mixed-batch panels across different facades. The cost of remediation is far lower than shrugging at the acceptance site.
Why does it land on this material?
The material selection meeting settled it in one go: PU stone skin. The reason is no mystery—the pace from substrate to delivery is fast, and projects operating while under construction rely entirely on it, and these two points are hard requirements in food-service cashier areas.
Related reading
Related pages are placed here for easier verification:
Archive Addendum · 110㎡ PU stone veneer (gray) wall application case in a restaurant
At project closeout, a few more notes were recorded, supplementing the main text:
- 3.2 Allocation by space The requirements for materials in different parts of the same project are not the same.
- Weight per panel approx. (kg) Wooden crate packaging (panels/crate) Area per wooden crate after packaging (㎡) Weight after packaging approx. (kg) Large panel / small panel (by color) Depends on color Lightweight By crate — — Optional colors: other colors can be customized.
- 2.1 Three questions for selection? Is the wall curved or column-shaped? Yes → Prioritize flexible materials that can be bent; No → Compare weight and construction period again.
- Introduction: The restaurant project is located in Guangzhou, Guangdong Province. The main wall material is PU stone veneer (gray), used for the cashier counter backdrop wall and dining area walls of the restaurant. The construction area is about 110 ㎡, completed by 3 people in 4 working days.
- Scrub resistance of high-frequency contact surfaces The 90–140 cm band above the countertop is the most frequently contacted height zone. Layout should avoid positions subject to frequent rubbing and knocking, or use cleanable edge trim pieces as transitions.
- Form and local areas about 12%% Custom-shaped panels according to drawings; on-site cutting accuracy of special-shaped pieces is insufficient ★Note: The proportions in the table above are common distributions for similar spaces, used to estimate material usage by area; actual quantities are subject to on-site measurement and layout drawings.
Previous:Analysis of approximately 200㎡ gray cement cast panel application at a clothing store in Nanning
Next:Guilin restaurant approx. 420㎡ rammed earth board: warm-toned wall analysis
Related articles
Korean BBQ restaurant 780㎡ woven linen flexible stone (warm brown) wall construction case
The Korean BBQ restaurant project is located in Duyun City, Guizhou Province,...

Ultra-thin PU stone veneer wall panel HCP-101A
Ultra-thin PU stone veneer wall panel HCP-101A is a PU three-dimensional wall...
Thin PU Stone Veneer Wall Panel HCP-101B
Thin PU Stone Veneer Wall Panel HCP-101B is a PU 3D wall panel from the IGOOD...
Thick version PU stone-skin wall panel HCP-101C
The thick version PU stone-skin wall panel HCP-101C is a PU three-dimensional...

Large Panel Stone Veneer Relief-600mm PU Stone Veneer Wall Panel HCP-102A
Large Panel Stone Veneer Relief-600mm PU Stone Veneer Wall Panel HCP-102A is ...
Construction case of 110㎡ PU stone veneer (gray) wall for a dining store
The dining store project is located in Guangzhou, Guangdong Province, and the...
cases related
Korean BBQ restaurant 780㎡ woven linen flexible stone (warm brown) wall construction case
The Korean BBQ restaurant project is located in Duyun...
View cases →
Construction case of 110㎡ PU stone veneer (gray) wall for a dining store
The dining store project is located in Guangzhou, Gua...
View cases →