
Construction case of mirrored wood-veneer ceiling and WPC grille walls at the Russian children's center
This article documents the division of labor, construction and acceptance control points of these three types of materials under the two premises of high humidity + children's use, as well as 7 application photos. Regarding the scope of this page: the material list comes from project materials; the location of each material is based on the application photos (mirror ceiling reflecting the water surface, dark vertical grille in the pool area, fabric-texture wall and gold seam lines in the restroom, all clearly visible in the photos).
Introduction
The walls and ceiling of a children's center (indoor children's pool) in Russia used three types of materials:Mirror wood veneerFor the pool hall ceiling, reflect the water surface upward;WPC gridFor the walls on both sides of the pool area, use vertical strips with gaps for ventilation;Cloth texture wood veneerUsed in the restroom, paired with gold lines and a baby care station. This article records these three types of materials inHigh humidity + children's useUnder these two premises, the division of work, construction and acceptance control points, and 7 application images.
- Project: Russia Children's Pavilion · pool hall ceiling, pool area walls, changing area, restrooms
- Location: Russia
- Main material.: Mirror wood finish (ceiling) + WPC grille (wall) + fabric-texture wood finish (restroom)
- Real photos: 7 photos (on-site shots)
Project file
| Project | Content |
|---|---|
| Space type | Cultural education |
| Business type | Children's Hall (indoor children's pool) |
| Country | Russia |
| Scale | Pool hall, poolside walkway, changing area, washroom |
| Construction location | Pool hall ceiling, walls on both sides of the pool area, changing area ceiling and walls, restroom walls |
| Main material. | Mirror wood veneer (ceiling), WPC grille (wall), fabric-textured wood veneer (restroom) |
| Actual photo record | 7 pieces (on-site shooting) |
Regarding the scope of this page:The material list comes from the project documentation; the location of each material is subject to the application photos (mirror ceiling reflecting the water surface, dark vertical grilles in the pool area, woven-texture wall and gold joint lines in the restroom—all clearly visible in the photos).The project's city, area, schedule, cost, and delivery year are not disclosed in the project materials; this page does not calculate or fill in estimated values; This article does not contain unconfirmed customer information or conversation content.
1. Customer industry usage scenario: why children's play centers use "mirror ceiling + vertical grilles"
The biggest difference between a children's hall and an ordinary commercial space is that it is simultaneously constrained by three conditions:High humidity, children, limited floor heightThe pool hall has heavy moisture year-round, children run along the water's edge, and the floor height of shopping mall or community venues is usually only around four meters. These three points determine the material and method, rather than choosing the material first and then working backward.
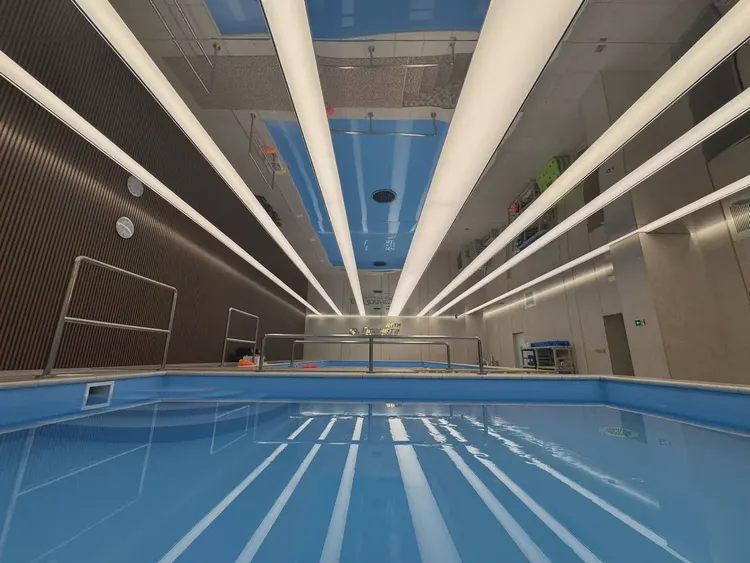
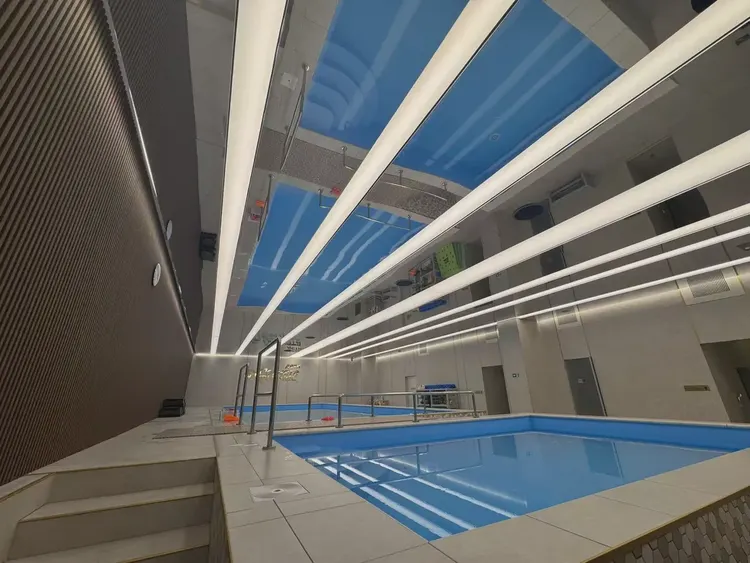
- Floor height is limited, but the pool body occupies the center.The pool itself occupies the center of the hall, leaving only passageways and walls on both sides. If the ceiling were made as an ordinary flat ceiling, the space would feel low and oppressive. UseThe mirror ceiling turns the water surface upward, visually adds a layer of blue "reflected space", which is the most direct move in the entire project.
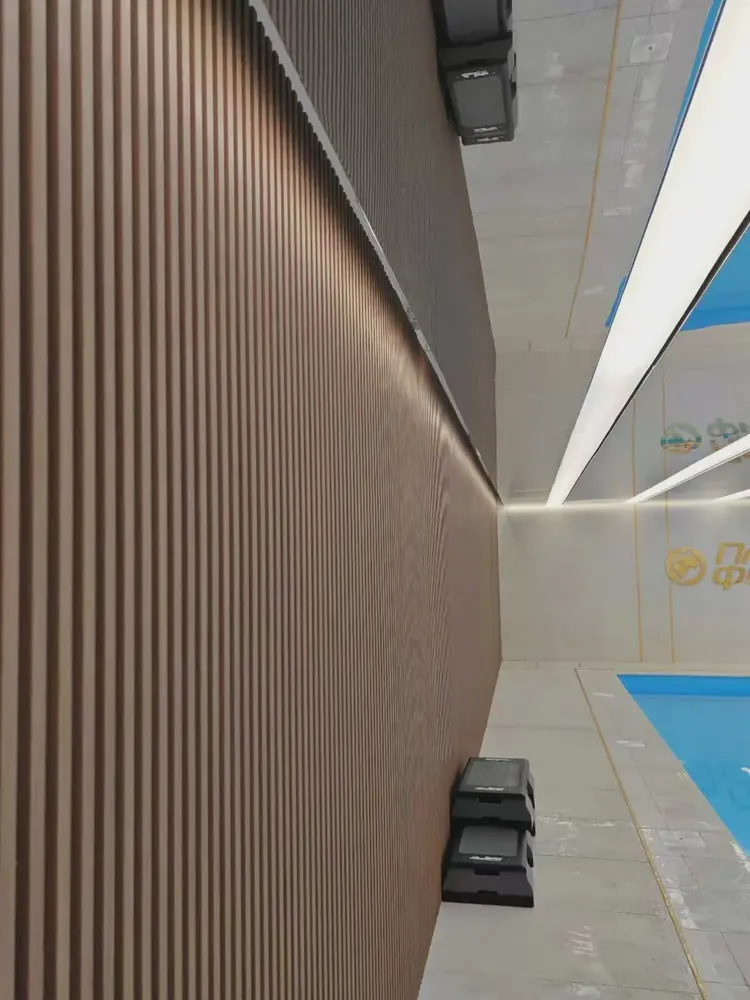
- In high-humidity environments, walls need to "breathe."If large flat panels are used on both sides of the pool area, moisture tends to accumulate on the back; vertical grilles leave gaps so air can circulate along the slats, making the surface less likely to retain water for long periods. This is both an aesthetic choice and a moisture-control choice.
- Vertical grilles also solve the "height" issue.Vertical strips visually draw the wall upward, and together with the mirrored ceiling, make the limited ceiling height appear more expansive.
- Two bottom lines for children's spaces: safety and environmental protection.Walls in educational spaces should have no sharp corners and no small parts that could fall off; the material's formaldehyde emission and combustion performance must be supported by test reports, not just verbal claims of environmental protection.
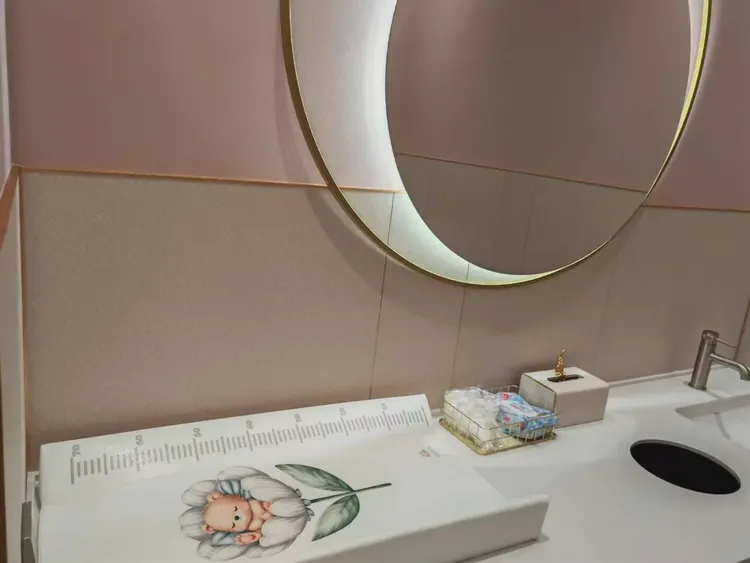
- The washroom is where "parents stay the longest."Parents with babies need to change diapers and tidy up in the restroom, and they stay much longer than in ordinary restaurant restrooms. The walls here should be soft and scrub-resistant, and there should be countertops that can be held onto and used to place things.
II. Material comparison: what the three material types each solve
2.1 Division table
| Materials | Visual characteristics | Position in this project | Role played |
|---|---|---|---|
| Mirror wood veneer | High-gloss mirror surface, clearly reflective; flat surface, fine joints | Pool hall ceiling | Flipping the water surface overhead visually raises and expands the space |
| WPC grid | Vertical thin strips, dark wood tone, gaps between strips | Walls on both sides of the pool area | Leave joints for ventilation and moisture prevention; vertical lines raise the perceived ceiling height; dark colors suppress water-surface reflections |
| Cloth texture wood veneer | Fine woven texture, matte, pink-beige tones; with gold seam lines | Restroom wall | Softens the "coldness" of the space, scrub-resistant, suitable for infant care areas |
2.2 The most difficult thing about mirror ceiling is not the material, but the base
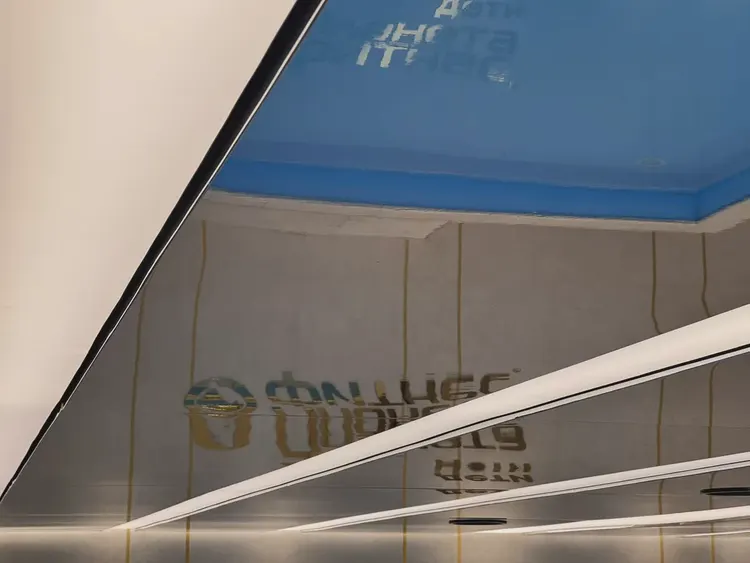
The characteristic of mirror materials is to "honestly magnify everything." Ordinary matte wall substrates have one or two millimeters of undulation, which is almost invisible to the naked eye; mirror surfaces cannot do this—reflection turns the undulation into waves, light bands are stretched into irregular curves, and the entire ceiling looks as if the water surface is shaking.
So the success or failure of this type of ceiling depends almost entirely onSubstrate flatness:
- the base layer must first be leveled as a whole, it cannot be aligned only at the panel joints.
- The panel itself must be flat and free of internal stress; there must be no bulging after installation on the wall.
- The light strip and the mirror surface must be offset: If the light source is close to the mirror surface, it will form a harsh reflected bright line on the mirror.
2.3 Why the grate is more suitable than the flat for the pool area
- Leave a joint = ventilation.The seams between the strips connect the space behind the wall with the indoor air, making it less likely for moisture to remain trapped behind the panels for long periods.
- Moisture resistance.WPC (wood-plastic composite) does not absorb water, it is not easy to swell or mildew in a long-term high humidity environment.
- Dark pressed finish.The pool water surface is very bright; using dark colors on the walls on both sides keeps the sightline from being drawn to the side walls, keeping attention on the pool body and the ceiling reflection.
- Vertical lines draw the height up.The vertical strips of the grille visually draw the wall upward, making it the least effort-intensive "height-boosting trick" under this ceiling height condition.
Why the bathroom uses fabric texture instead of glossy surface
Two things need to be handled in the children's hall restroom: first,Cool——The combination of tiles and stainless steel is naturally cool; secondlyNoisy——Hard walls reflect sound very loudly, which can be uncomfortable for parents with babies. The fine texture and matte surface of the wood grain veneer exactly alleviate both of these points: visually warm and acoustically "absorbing". Adding a golden dividing line also divides the entire wall into proportional blocks, preventing it from being monotonous.
3. Configuration plan
3.1 Allocate by part
| Location | Materials | Configuration key points |
|---|---|---|
| Pool hall ceiling | Mirror wood veneer | Overall substrate leveling; linear light strips and mirror surfaces arranged with offset; panel joints aligned with light fixture divisions |
| Walls on both sides of the pool area | WPC grid | Vertical strips full height; even strip spacing; reserve space at top for access and light fixtures; edge trim at corners |
| Changing area ceiling | Grid (light color) | Echoes the pool area but in a lighter color to avoid making the changing area too oppressive |
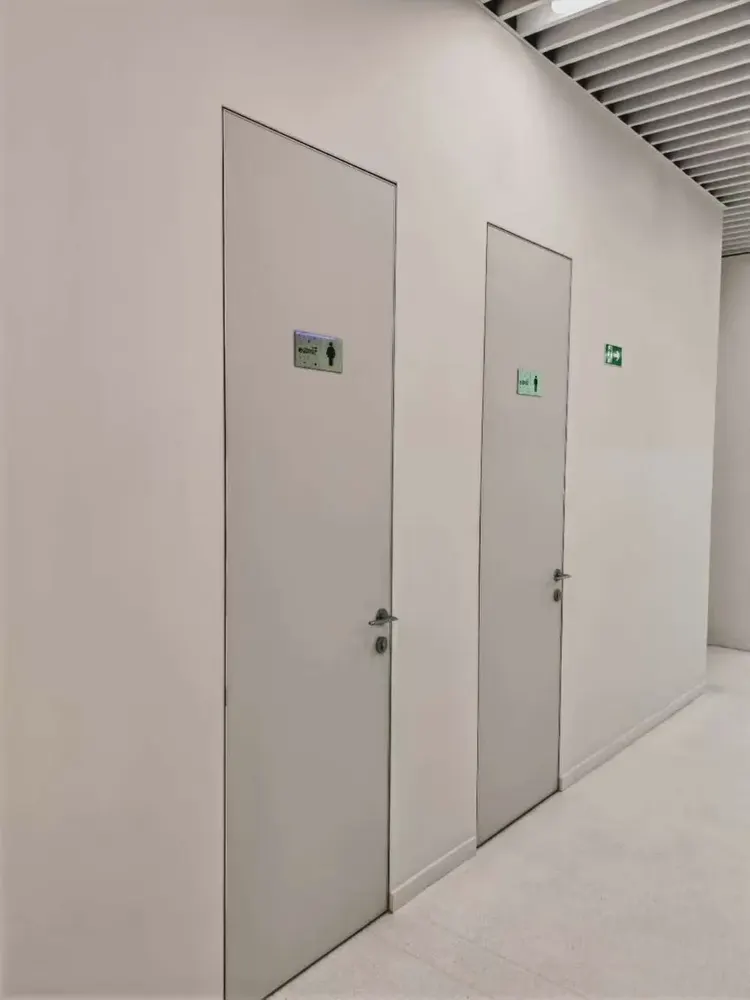
| Changing area wall | Finish panel + concealed door | Door and wall on the same plane and same color, with door gaps controlled at the fine-line level |
| Restroom wall | Cloth texture wood veneer | Pink-beige series; gold joint lines divided proportionally; baby care table area treated for scrub resistance |
3.2 The relationship between light and the mirror surface
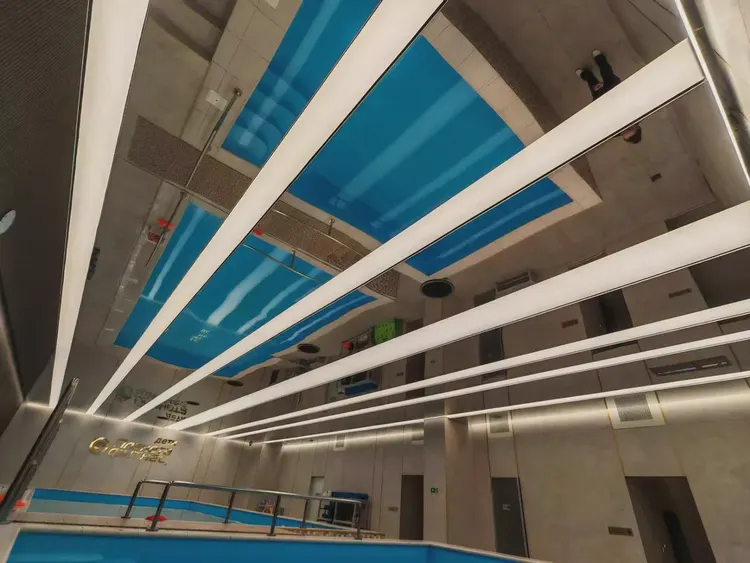
Half of the effect of a mirror ceiling comes from light. This project used rows ofLinear light strip, arranged parallel to the mirror surface: when the light strip is on, the mirror reflects both the light strip and the water surface, creating alternating "light—water—light" bands on the ceiling. If the light strip and mirror are too close, or the light strip direction crosses the panel joints, the reflection will be messy and glaring.
The principle is:The light strip should follow the panel joints, keep its distance from the mirror surface, and avoid forming an angle that directly exposes the light source on the mirror surface.
3.3 Material List
- Bonding materials: Use water-resistant adhesive in high-humidity areas; ceiling areas require consideration of self-weight and long-term bonding reliability.
- Leveling : overall leveling of the ceiling (mirror surfaces have the highest flatness requirements).
- Edge finishing: Edge trim strips for mirrors and walls, edge trim pieces for the top and bottom of grilles, gold joint line profiles.
- Light strip and profiles: Linear light slots, LED strip aluminum profiles, moisture-proof LED strips.
- Tools: 2m/3m straightedge, laser level, cutting knife, suction cups (for hoisting large mirror-finish panels).
IV. Construction process and acceptance control points
4.1 Five Steps of Mirror Ceiling
- Overall substrate leveling: First apply an overall leveling layer; do not level only at panel joints. After completion, check the entire surface with a long straightedge; any excessive undulation must be redone.
- Embedded parts and chalk lines: Light strip grooves, access openings, sprinklers, and air vent positions are all pre-embedded and positioned, and lines are snapped according to panel dimensions.
- Trial layout : for large mirrored panels, first do a trial layout on the ground to confirm texture and seam direction, number them, and install on the wall by number.
- Wall application: Use suction cups with multi-point support to lift panels, apply adhesive evenly, press firmly to expel air; carry out large areas in sections.
- Edge finishing and light testing: After the closing strip is installed, turn on the lights and check for harsh reflections or abnormal light bands.
4.2 Four Key Points of Lattice Wall Surface
- Verticality first: Once one vertical strip is crooked, it will be visible across the entire wall. During installation, check each strip with a level.
- Even strip spacing: The strip spacing at both the starting and finishing ends must be consistent; there must not be dense spacing at one end and sparse at the other.
- Leave joints for ventilationThe seams must run through; do not seal the top, so that air can circulate up and down.
- Edge finishing: Press the top and bottom with edge trim pieces to avoid exposed ends and dust accumulation.
4.3 Acceptance control sheet
| Control items | Inspection method | Key points for determination |
|---|---|---|
| Ceiling substrate flatness | 3m ruler + feeler | Minimal undulation; after lights are on, the mirror surface has no waviness and no distorted light bands |
| Mirror reflection inspection | Visual inspection under light | The reflected water surface and light strip lines are straight, with no abnormal bright spots |
| Panel joints aligned with light strips | visual inspection | Panel joints parallel to light strips, not offset or crossing |
| Grille verticality | Spirit level / plumb line | Each vertical strip is plumb, and the entire wall has no tilt |
| Grille strip spacing | Sampling test | Consistent strip spacing, symmetrical at both starting and ending ends |
| Sealing and edge finishing in high-humidity areas | Visual inspection + hand touch | Edge trim pieces fit flush, ends not exposed, no sharp corners |
| Restroom joint line | visual inspection | The gold lines are straight, with consistent division proportions and no edge curling |
| Child safety items | Visual inspection + hand touch | Within children's reachable height: no sharp corners, no loose parts, no easily detached small pieces |
V. Image display and application description
The following 7 images are project application photos, arranged in the order of "pool hall → mirrored ceiling → grille wall → changing area → washroom."
VI. Communication and Confirmation Process: Several Things to Be Settled in Advance for Similar Projects
In projects like children's halls, rework is often not a material problem, but ratherInterfaces with MEP and safetyNot aligned in advance. The following points are recommended to be confirmed one by one before construction starts:
- The MEP points in the ceiling.Sprinklers, air vents, speakers, light strips and access panels must all be finalized before mirror layout—once the mirror is on the wall, cutting holes afterward will look very bad.
- Angle between the light strip and the mirror surface.Calculate the reflection angle once based on people's eye height, to avoid standing at the pool edge and looking up directly at the light source.
- Safety treatment within children's reachable height.For trim pieces, grille ends, and door gaps below 1.2 meters, check whether there are sharp corners or detachable small parts.
- Matching of materials and adhesives in high-humidity areas.Both the pool area and restrooms must use water-resistant systems, and it must be clearly defined which parts are waterproofed.
- Privacy and circulation in the changing area.The door position, opening direction, and degree of concealment must be confirmed according to the actual changing-room workflow, not just by looking at drawings.
- Cleaning and maintenance methods.How to clean the grille strip gaps and how to wipe the mirror surface without leaving marks — executable methods must be provided at handover.
Seven, usage effects and daily maintenance
7.1 How is the sense of space "doubled"?
From the actual photos, the most direct effect of the mirrored ceiling is: standing by the pool and looking up, you see not only the ceiling but also a whole expanse of blue water surface and light strips. The spatial height is visually doubled, and the original ceiling height of about four meters no longer feels oppressive. The dark grille wall darkens both sides, and the line of sight naturally concentrates between the pool body and the reflection; the "center of gravity" of the entire hall shifts from the walls to the water surface.
7.2 Daily maintenance
- Mirror ceiling: Use microfiber cloth with neutral cleaner; remove dust first, then wipe, avoiding dry wiping that leaves scratches; during high-humidity periods, ensure ventilation to reduce surface condensation.
- Grille wallFor dust accumulated in the seams, use a vacuum cleaner with a narrow nozzle; do not repeatedly wipe the seams with a damp cloth, as this will push the dust into the seams.
- Restroom fabric-texture wall: Wipe with a slightly damp soft cloth; regularly disinfect around baby care stations and avoid strong solvents.
- Golden seam line: Wipe with a dry cloth along the grain; if edge lifting is found, reapply adhesive promptly to prevent water ingress.
- Child safety: Regularly check whether edge trims and grille ends below 1.2 meters are loose.
7.3 Post-delivery Recheck Sheet
| Review items | Time point | Points of concern |
|---|---|---|
| Mirror ceiling appearance | After 1 month of use | Whether bulging, waviness or joint misalignment occurs |
| Edge finishing in high-humidity areas | Every quarter | Do grid ends and mirror trims warp? |
| Light strip and reflection | Every six months | Whether the light strip has failed sections, and whether new bright spots appear in the reflection |
| Child safety items | Every month | Below 1.2 meters, check for loose parts, sharp corners, and detachable small parts |
| Restroom joint line | Every quarter | Whether the gold lines have debonded or curled at the edges |
VIII. Common questions (FAQ)
Can a mirror ceiling be used above a swimming pool?
Yes, but one premise must be accepted: a mirror finish will magnify any defect in the substrate. Therefore the substrate must be fully leveled, the panels themselves must be flat, and the light strips and mirror surface must be offset in angle; otherwise waves and harsh bright lines will appear when the lights are on.
Why use grilles instead of whole flat panels for the pool area walls?
The strip gaps in the grille allow air to circulate, making it less likely for moisture to remain on the back of the panels for long periods, which is critical in high-humidity environments; at the same time, the vertical strips visually raise the ceiling height, and the dark color also suppresses the strong reflections on the water surface.
Will WPC lattice mildew in a high humidity environment?
WPC (wood-plastic composite) does not absorb water, it is not easy to mildew in normal use. It should be noted that the accumulation of dust in grooves - dust and humidity are the breeding ground for mildew, and a vacuum cleaner should be used to clean the grooves on a daily basis, and do not use a damp rag to wipe repeatedly.
What should be paid special attention to regarding walls in a children's hall?
Two bottom lines: safety and environmental protection. Safety means no sharp corners and no small parts that could fall off within children's reach; environmental protection means formaldehyde emission and combustion performance must be backed by test reports. These two are not "do your best" items—they are hard thresholds.
Will the fabric-textured wood veneer in the washroom be resistant to dirt?
Cloth texture is a matte fine texture and can be wiped daily without issue. What really needs attention is the area around baby care stations—these need regular disinfection, so neutral disinfectants are recommended; avoid strong solvents that could damage the surface layer.
How to clean a mirror ceiling without leaving marks?
Dust first, then wipe with an ultra-fine fiber cloth and a neutral cleaner, wiping in one direction; do not dry-wipe, as dry wiping turns dust into sandpaper and causes scratches. In high-humidity seasons, ensure ventilation to reduce surface condensation.
How do the sprinklers and air vents in the ceiling coordinate with the mirror surface?
All must be finalized at the layout stage and pre-drilled and embedded before panel installation. Once mirror panels are on the wall, drilling holes leaves edges that are hard to clean up and highly visible under reflection.
IX. Project File and Contact Information
This article documents the ceiling and wall approach for the Russian children's center (indoor children's pool). Similar projects (children's centers, swimming pools, family spaces, water education centers) can refer to this article's combination of "mirror ceiling + vertical grille + soft fabric texture" and high-humidity area control points when developing their plans.
- Project: Russia Children's Pavilion (indoor children's pool)
- Location: Russia
- Main material.: Mirror wood finish (ceiling) + WPC grille (wall) + fabric-texture wood finish (restroom)
- Location: Pool hall ceiling, walls on both sides of the pool area, changing area, restrooms
For material selection advice, samples or quotations for similar projects, contact IGOODS: Phone / WeChat / WhatsApp 19136341389; or visit theContact Uspage.
Same category scene cases
Relevant Materials and Solutions
Flexible Stone Solutions Selection Guides Request sample quotationFind the appropriate wall expression for your project.
Provide the type of space, wall area, and design intention. Communicate about materials, samples, and quotations.